ChordPad for the PalmOS PDA
Documentation by Maria &
Steven Cahill, Ten Spiders Software
Partial Table of Contents
Chord Pad - the Palm
Application.
e) Creating Chords in One
Category.
g) Deleting all the Chords
in a Category.
4. Returning to the Database
Manager
Conduit - the Bridge Between
Your PDA and Computer
Chord Pad Viewer - the
Computer Application.
Introduction
Chord
Pad is the palm application that creates databases of chords diagrams. We've
included a few databases to get you started, but the intent here is that you're
playing your guitar, mandolin, bass, five string or four string banjo and you
find a cool chord that you don't know the name of and don't want to
forget. You can make a picture of the
chord here and do lots of other things that you'll find out about below.
The
ChordPad Viewer, a Window only application, can read PalmOS ChordpPad backup
files and converts the diagrams to .jpg or .png files integrating them into a
simple HTML document. The viewer
application is installed using the ChordPadViewerSetup.msi file. After installing ‘ChordPadViewerSetup.msi’
see the ‘ChordPad Viewer Help.doc’ in the directory where you installed it.
Installation
‘chordpad.prc’ is the Palm OS application. Here 2 ways to install the application to your Palm:
1) Double click ‘chordpad.prc’ and select the User to install the
application.
2) In the Palm Desktop application - select Install under the View
menu. Once in the Install Tool, select
the User. Then hit the ‘Add…’ button
and select the ‘chordpad.prc’ file.
Also select any of the distributed databases you wish to install at
this time by selecting ‘Add…’ again or by just dragging any of the files into
the Install Tool dialog window.

After clicking ‘Done’ HotSync the device to install the files to your
palm (hit the button on the cradle).
ChordPad - the Palm Application
There are two main areas of the PDA program you'll
spend most of your time in, the Database Manager or the Chord Manager.
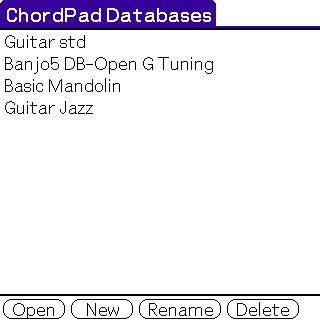
Database view listing all loaded databases.
A. Database Manager
1. When you start the program, you'll be in the DB
Screen. Four buttons at the bottom of
this screen, "Open", "New", "Rename", and
"Delete", allow you to create and manipulate databases. Tap on these buttons to enable them or just
write the first letter of the button.
2. Open
Use this to open existing databases. You can also double tap the name of the
database.
Use this to create a new chord database.
a) This takes you to an intermediate screen where you
define the name of the new database
(maybe the name of the song and the instrument you're using, if you play
more than one).
b) Pick the instrument that you want to make chord
diagrams for from the pop up menu on your screen. Your choices are guitar, mandolin, bass, 4-string banjo, or
5-string banjo.
c) If you plan to use standard tuning, tap the
"Standard Tuning" button and you'll move to the Chord Manager. If you want to change the tuning, tap the
"Set Tuning" button and you'll move on to the "Adjust Instrument
Tuning" screen.
The notes for each string are listed from highest
pitch (1st string) to lowest pitch (last string). Tap on the letter to change the line so it
points to the string you plan to retune.
Now tap the up and down triangles/arrows to change to the desired note. When you're finished, tap "OK" to
get to the Chord Manager or "Cancel" to make the computer forget you
ever went to this screen and go back to the Database Manager.
Obvious right?
Renames the database.
Hopefully, also obvious. Deletes the database.
B. Chord Manager
There are basically three areas of the Chord
Manager, the instrument neck, the chord name buttons, and the (upon starting)
presently empty chord diagram area.
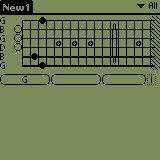

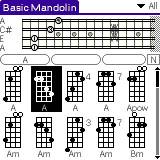
Neck view of 1) new database, 2) after clicking the ‘G’
button 3)‘Basic Mandolin’ database (high res device)
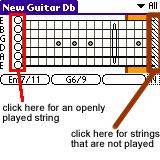
1. Instrument Neck
On the left is the note of each string. When you start a new database, all your
strings are open, indicated by the open circles just to the right of the string
notes. The instrument neck has frets
(vertical lines), strings ( horizontal lines), and likely fret markings to help
you find the right fret. Notice that
the fat strings on the bottom indicate the lower pitch strings.
a) Use your stylus to tap anywhere on the neck. The circle is shown filled in and moves from
the open position to the fretted position you chose, and the name of the note
changes accordingly.
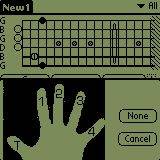
b) Use your stylus to drag the chord up and down the
neck. Double tap each black circle to
indicate left hand fingering.
Double tap each black circle to indicate left hand
fingering. This fingering will appear on
the neck when the chord is selcted on your palm and will appear in the HTML
file created by the ChordPad Viewer on your desktop computer.
Tap all the way to the right of the neck (within the
diagonal lines) to indicate that you will not be playing that particular
string.
Use the "Place Capo" function in the
Options pull down menu. Tap anywhere on
the fret you wish to place the capo and them tap the button "Place
Capo". Tap the "Cancel"
button to go back.
To use cut-out capos (where only certain strings are
capoed), use the Options pull down menu to access the "Place Capo
Pieces" function. Tap anywhere on
the fret and string you wish to place the capo or in the open circle area. Like chords, use the stylus to drag the capo
pieces together up or down the neck.
Tap the button "Place Capo" to finish or "Cancel" if
you changed your mind.

Double tap back in the open circle area or by using
the "Clear Neck" in the Options pull down menu (Command i or just i).
The program will give you up to three valid names
for a chord. Tap on a button with text
in it to create a chord diagram with that name.
All the chord diagrams you've created with the Chord
Name Buttons will be here. When the
screen is full, use the scroll bar that appears on the right or the physical
scroll buttons on your PDA to see them all.
All chord diagrams shows a few frets, all the
strings, which strings are fretted and which are open, and the chord name.
If you see a number just to the right of the
diagram, this means the fingering started at that fret. If you see a lowercase c with a number beside
it, that indicates you used a capo on the nth fret. If you see a lowercase c with an asterisk, that indicates you
used capo pieces to make the chord.
Tap once on a chord diagram. If you entered fingerings or used a capo to
create the diagram, you'll see them reflected on the neck.
Double tap the diagram to rename the chord.
Double tap the diagram to rename the chord. A pop up menu on the screen appears with
the initial choices of "Bridge", "Chorus", or
"Verse". Tap outside the pop
up menu to keep the default, "Unfiled" or on one other choices to
change it.
The Category pop up menu is in the upper right part
of the screen with "All" as the default. Tap on it and you'll see "Bridge", "Chorus",
"Verse", "Unfiled", and "Edit Categories". Tap "Edit Categories" to go to
another screen to manage them. Your
self-explanatory button choices are "OK", "New",
"Rename", and "Delete".
e) Creating Chords in One
Category
Use the Category pop up menu in the upper right part
of the screen to choose the category you want.
Now, all the chord diagrams you make will automatically be in the chosen
category until you choose a new category.
f) Editing Chord Diagrams
Use the Edit pull down menu to cut, copy,
paste, or delete chords. You can also
cut (Command-x or just x), copy (Command-c or just c), paste (Command-p or just
p) and delete (Command-d or just d) with your stylus. Paste will place the chord after a highlighted diagram or at the
end if no diagrams are highlighted.
Highlight a chord by tapping it once.
g) Deleting all the Chords in a
Category
Use the "Delete Category Chords" function
in the Adv pull down menu to delete all the chords in a particular
category. This function only works when
you're actually in that category (by choosing the category with the pop up menu
in the upper right corner). It doesn't
work when the Category is "All".
(Tip: Use the "Delete" button in the Database Manager to get
rid of everything.)
4. Returning to the Database
Manager
In the Options pull down menu, choose "Open
Database Mgr…" or use Command-O or just O.
Modes
Under
the Adv menu you will find the 2 modes:
Normal
– Clicking
on the guess chord name button just adds the chord to the database at the end
in the current category (default mode).
Insert
Mode - Clicking
on the guess chord name button will bring up
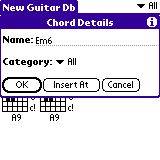 à
à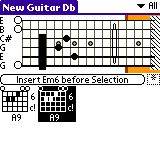 where
hitting OK will just add the chord to the end or ‘Insert At’ will then insert
the chord before a selected chord in your database after you hit the new
button.
where
hitting OK will just add the chord to the end or ‘Insert At’ will then insert
the chord before a selected chord in your database after you hit the new
button.